
Those of you with Macs earlier than Late 2009 have no doubt realized that MacOS Sierra cannot be officially installed on your computer. However, with a simple firmware update and/or some hardware updates, it’s entirely possible to breathe new life into your machine, hopefully for some years to come. If you also have a MacPro, most of this is easier than you may think.
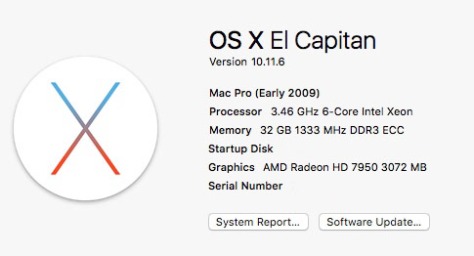
After considerable research, I succeeded in upgrading my Early 2009 Quad-Core MacPro so that it is virtually a new machine. I replaced the original CPU with a Xeon X5690 ($225 on ebay), the graphics card with a Radeon AMD 7950 3GB ($250 on ebay), the RAM with 32GB of 1333 mhz DDR3 RAM ($65 on ebay), the wifi and bluetooth with a custom solution from OSXWifi ($110), and added USB 3.0 support with a Sonnet Allegro PCIe card ($55 on Amazon). After adding 2 USB 3.0 hubs and a couple 6′ USB 3.0 cables, the total cost came to $817.
 There’s already an wealth of information out there on how to do all of this, but I wanted to share some important things I learned that may be helpful or not obvious.
I have yet to actually install Sierra, but it’s now ready to go.
Flash the Firmware
 Before I began hardware updates, I flashed the MacPro firmware from version 4,1 to version 5,1. This is necessary to install MacOS Sierra and for the Mac to recognize the faster 1333mhz RAM (with a compatible CPU). Indeed, flashing the firmware alone is enough to install Sierra, but performance may suffer. When running that tool, I initially got an error. I found that the firmware update tool expects to download a firmware update file from Apple from a link that has moved, so you need also to download that EFI firmware update file and mount it on your desktop, where the tool will find it. Also, if you’re currently on El Capitan, you will need to disable SIP (System Integrity Protection) before running the tool, then re-enable it afterwards. After successful flashing the firmware and before any hardware installations, and again after they are all completed, reset the PRAM. MacOS Sierra should now be available in the App Store.
Hardware Upgrades
Needless to say, you’ll want to disconnect all cables, work on a static-free cloth on a flat surface, and ground yourself by touching the metal case, before doing this surgery.
Replacing RAM is very simple. If you aren’t comfortable doing that, you probably won’t be comfortable doing any of the rest of this. If you have your new RAM ready to go, it would be best to remove the old RAM, then replace the CPU, then install the new RAM. In my case, I was waiting on the RAM shipment so I replaced the RAM later, which meant I had to reset the PRAM again afterwards.
Replacing the CPU on this single-processor MacPro was considerably easier than I feared it might be. I read many reports about heatsink problems and needing to remove the CPU lids (or buy delidded CPUs) and install custom spacer washers, etc. I was tempted to have it professionally installed. Here is one very expensive upgrade-by-mail service. But then I learned those problems were specific to later MacPros with two processors. For this machine, it was a piece of cake. The CPU tray pops out easily (and you need to take it out anyway to install the wifi/bluetooth card). You just need a long 3mm t-handle hex wrench, some thermal paste, and some 70%+ isopropyl alcohol and a dust-free cloth to clean the old thermal paste from the old CPU and the heatsink contact. It doesn’t matter what thermal paste you use. Arctic Silver 5 comes highly recommended, but I couldn’t get it locally when I needed it, so I went for a similar silver-based paste from Best Buy. There is much discussion about the best technique for applying termal paste, but I chose to spread a thin layer and it seems fine. There’s a little arrow in the corner of the CPU that indicates exactly which way it should be seated. I counted full turns of the hex screws when removing the heatsink, as widely recommended, but it was easy enough to hear (and feel) when the screws “clicked” out (and then back in). When reattaching the heatsink, the number of turns was not exactly equivalent to the removal counts, but it was close enough. You don’t necessarily need to buy the Xeon X5690, but you’ll want a Westmere (W36xx or X56xx series) CPU.
Before replacing the graphics card and installing any other PCIe cards, you might want to take the opportunity to replace the PRAM battery (CR2032), because it’s located behind these cards.
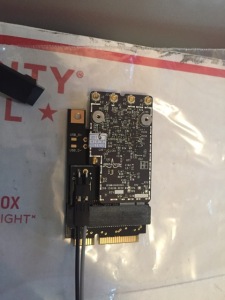
 Choosing the right graphics card requires research and will depend on your needs. One great source of info is macvidcards.com but they won’t necessarily have the best solution or price for you. The AMD 7950 requires no drivers or external power source, and it supports Metal, and it had all the ports I needed (DVI and mini-display port). If you want to see a boot screen, you must make sure to get one that has been flashed with the Mac EFI (or buy the more expensive Mac edition with the DIP switch set to the Mac position). The one I got is pictured here, but there are multiple styles and fan assemblies. The more expensive out-of-the-box Mac Saphire edition is white (I’ve also seen red ones).
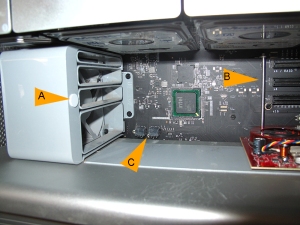 The graphics card was pretty easy to install. Note that you’ll want to put the graphics card in the fastest bottom slot (#1), and you will need to take off the silver PCIe slot covers for slot #1 & #2, as the graphics card takes the space of both those two slots. The AMD 7950 (and many others) has two power cables that must be connected to aux USB power jacks (C on image right). It was not obvious at first how those connectors fit, but they did. Make sure to get a card that includes the cables, or you’ll need to order two PCIe Mini-6 Pin to 8-pin cables separately.
Installing the Sonnet USB 3.0 PCIe card was even simpler. Just remove the PCIe cover and snap it into one of the available top slots.
Note that I chose a Sonnet because it’s widely reported to be compatible, while I read reports about other brands causing kernel panics. Also note that there is a normal and a pro version of this card. Each has four USB 3 ports but the more expensive pro version has separate controllers for each port (and comes with a 5-year rather than a 1-year warranty). I went with the cheaper version, which may have been a mistake.
I bought an Anker USB 3.0 hub, one of the top-rated multi-port powered hubs available. Unfortunately I found that I could not run 4 external USB 3 drives off that hub, as one drive would basically get stuck. I had to move it back to an older USB 2 hub. Anker tech support confirmed that running 4 drives off the hub was pushing it, even though it’s a 10 port hub, and told me that USB 2 is more stable! So for now, I’m accepting the truth of that. I’m not sure whether if I had gone with the more expensive Sonnet Pro card, I’d be in a better situation in that regard. I also bought this Sabrient hub to sit on my desk because it looks slick and its cable runs out the back rather than the side. Both hubs annoyingly came with too-short 3′ USB cables, so I had to order 6′ cables for each. Check the connections in advance. The Anker needed a type A to B cable and the Sabrient needed a type A to micro-B cable.
I’ll add that now may also be a good time to install a solid-state drive (SSD) and use it as your boot drive, but I had done that long ago already.
Upgrading Wifi and Bluetooth
OSXWifi Wifi+BT4.0 Kit
To take advantange of Continuity (Handoff, etc.) you will need to upgrade your Wifi and Bluetoth on a single combination card. This is potentially a cheap upgrade, but it was the hardest one to do. I decided to go with the kit supplied by OSXWifi. Here’s a very detailed guide to doing this yourself. My hunch is that the OSXWifi kit was first assembled based on that information.
If you opt not to use that kit to save a bit, you would need a Broadcom BCM94360CD card which provices 802.11ac wifi and Bluetooth 4.0. You’ll also neeed a Mini-PCIe adaptor, a specific kind of USB power cable, and some kind of bluetooth antenna or antenna cable extender. For me, sourcing those two cables was the bottleneck. It is unclear to me if the 2 cables that come with that linked Mini-PCIe adatpor are the right ones. I also expected great installation instructions and support from OSXWifi, but was very disappointed on both counts. The included instructions assume you know where to install the card in the first place and could have been clearer in other respects. Support was completely non-responsive after multiple inquiries by email and twitter. They claim Continuity features just work, but they didn’t (seee below), and they provided no assistance whatsoever with this problem or installation questions. Their site looks slick, and I expected much more for their premium price.
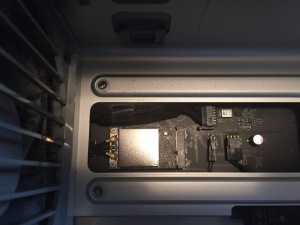
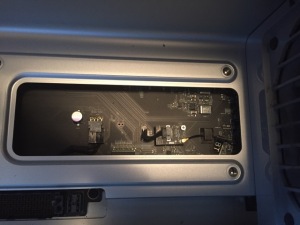
In a nutshell, here’s what I learned. On the Early 2009 MacPro and later, you remove the CPU tray, and behind that (with the MacPro on its side) sits the original airport card on the left and the original bluetooth chip on the right. (On earlier MacPros, the location is above the CPU tray.)
MacPro Original Wifi (Airport) Card
MacPro Original Bluetooth Card
After finding where this goes, the main things that confused me was that the existing wifi antennas appear to be soldered, and there were only 2 of them connected on my Mac. It turns out they are not soldered, but snap on and off, and there is a third antenna cable tucked behind to the left. It remained unclear to me if it mattered what order the wifi antennas are connected. (So far either I got lucky – as wifi works with a solid signal – or it doesn’t matter.) The instructions only specified the right place to connect the bluetooth antenna extension cable (the 3rd contact from the top).
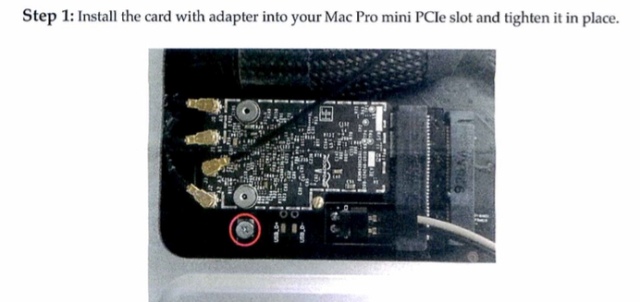 You need nimble fingers and patience to remove the old airport card and install the new one and connect the antennas. I kept losing the screw in the case. I would recommend a magnetized philips screwdriver. The original card used two mounting screws; the new one only needs one.
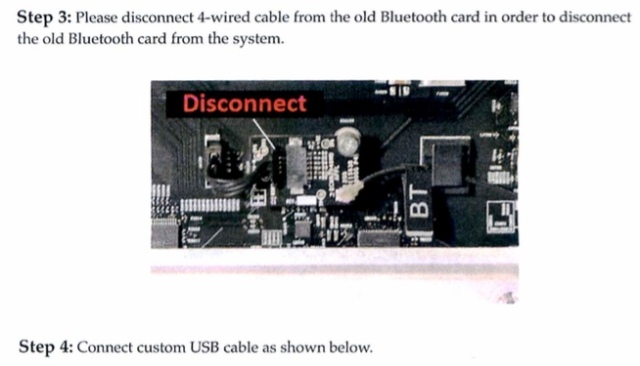
After inserting the new card, mounting it with the single screw, and connecting the 3 wifi antennas, you then need to bypass the old bluetooth chip and provide the new card power and a bluetooth antenna. If using that kit, you unplug the USB power connection to the left of the old bluetooth chip, and then use the provided “custom” USB cable to connect the new card’s USB to the old bluetooth card’s USB power supply. Then you also need to connect a bluetooth antenna. When ordering the kit you’re given the option of buying an extender cable or buying an external antenna. What the former does is provide a way to attach the existing internal bluetooth antenna, which you disconnect from the old bluetooth chip, to the antenna connection on the new card. That part is fairly clear with the supplied antenna extender cable and the instructions. There are other ways to achieve this if not using their kit, using a new bluetooth antenna.
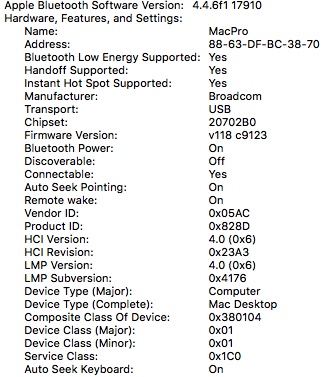 I installed all of this correctly, as evident by the new System Profiler report after booting back up.
Note that it says “Yes” in three crucial places: low energy, handoff supported, instant hot spot supported. Also for LMP version it says “4.0 (ox6)” as it should.
All that said, the story was not over! Continuity features including Handoff and Airdrop didn’t work as advertised, my bluetooth pairings were now outdated, etc. So there was still some work to be done on the software side.
Further Steps and Solutions
I now had quite a lot of new hardware, and it would take a little bit of work to get the system to play nice with all of it. As mentioned above, resetting the PRAM is a must. You may need to re-join wifi networks or mess a bit with network settings. All bluetooth pairings needed to be redone. It might be good off the bat to delete the system bluetooth preferences file:
/Library/Preferences/com.apple.Bluetooth.plist
Doing that is one of the commonly-mentioned troubleshooting steps in getting Handoff to work anyway. So turn off bluetooth, delete the file, reboot, turn bluetooth back on, and then re-pair any devices. (Note that pairing an iDevice with the MacPro is not necessary and may even interfere with Continuity.)
What I found was that Handoff would simply not work. The option to “Allow Handoff” was present in General System Preferences (as it should be if you get the 3 “Yes” above). But it did not just work. I tried all these troubleshooting steps and more, without any success. For some time, I thought it was necessary to apply a kext patch using something called the Continuity Activation Tool. (Here’s one long discussion thread about it.) But it turns out that despite much misleading information, it is not required with this BCM94360CD card and any 2008-2012 MacPro. (For what it’s worth, the tool does provide some useful diagnostic information.)
So why wouldn’t it work? On a hunch, after reading alot about patching kext files, I decided to purge the system kext file cache, using Cocktail. (No doubt you could do this in terminal as well.) After rebooting, voilà! Handoff started working normally. I can’t know if doing that initially would have been sufficient to get it working, because I also had previously and repeatedly taken all the troubleshooting steps, including logging out and in to iCloud on both devices, which is a pain. (On the iPhone it means having to set up Apple Pay again, and on the Mac some settings relating to the iCloud Apple ID such as the default mail, contacts, and notes account had to be reset, for instance.)
Unfortunately, no matter what I’ve done, I cannot get AirDrop to work except by fluke. Most of the time, the iPhone doesn’t appear at all in the MacOS Finder, and the Mac doesn’t appear in the Sharing section of the iPhone. Occasionally it does, after repeatedly toggling wifi, bluetooth, and AirDrop, on both devices. Once, I succeeded sending an image from the Mac to the iPhone, but only once, and never yet in the other direction. I believe the consensus is that this feature is just flaky on a wide variety of set-ups. I give up. Unless any of you gentle readers have a magical solution to share.
Other continuity features either worked without much trouble (celluar calls, SMS, instant hotspot) or have not been tested yet (universal clipboard) since they require Sierra.
Conclusion
My system definitely feels snappier overall. Once I’m confident all is completely in order, I’ll install Sierra. When I can afford it, I may get a new primary display. The only thing this machine now lacks is a thunderbolt connection, but I’m quite happy with USB 3.0.
Here is the Geekbench report with the original CPU and 16GB of 1066mhz RAM: 1890/6483 (single-core/multiple-core). And here is the report with the upgraded CPU and 32GB of 1333mhz RAM: 2923/12070. And here is the report for the GPU: 95080. These numbers means little to me, but they sure seem bigger.


I have a 2012 Mac Pro model 5,1 running Sierra and I too bought the same Wifi kit from OSXWIFI. I cannot get Handoff working at all. I tried flushing the kext system caches as you suggested, but handoff still does not work. I also installed Sierra clean on a new hard drive and that did not fix it either. I’m wondering if you’ve upgraded to Sierra and if you were able to get Handoff working?
LikeLike
It’s really hard to pin down. As I mentioned, flushing the kext caches worked for me on El Cap, but Handoff stopped working on Sierra, and AirSharing then started working. I continued to troubleshoot to not much avail (including all the usual steps) and then suddently Handoff started working again sometime after 10.12.3. I suspect one thing that may have nudged it along was switching to two-factor authentication on iCloud. It could have been just a coincidence. Also, it might be related to MacOS 10.12.4 – I’m on a developer preview. Handoff started working sometime after upgrading to that. However 10.12.4 was so aggressive about switching to two-factor auth that I finally relented soon after upgrading to 10.12.4. So can’t tell if either one was responsible or both were, or what.
LikeLike
For me the ultimate solution was a reboot. After three days of logging in/out of iCloud, toggling settings, dumping caches, rebooting devices, etc…. I finally discovered this simple process… 1. log out of iCloud, 2. REBOOT, 3. log into iCloud… all Continuity features are working now. I’ll admit, so many other things were already done, it’s hard to say if previously zapping the PRAM helped this along.
I’m amazed that Apple still has not fixed this feature so that it reliably starts up when it’s supposed to.
LikeLike